On July 5th, I had the pleasure of hosting the third Sitecore User Group event in a year, alongside my esteemed colleagues Ugo and Ram. Despite being a remote session streamed on YouTube, the event was filled with exceptional Sitecore content and insightful discussions.
Let’s take a closer look at the agenda and the remarkable speakers who graced the event!
Agenda and speakers:
Sessions
🔹 Guido van Tricht: “Getting started with hosting Sitecore on Kubernetes”
Guido kicked off the event with an informative session on hosting Sitecore on Kubernetes. His step-by-step guide provided invaluable insights for beginners and those looking to deepen their knowledge on this topic.
Ehsan explored the fascinating world of AI-based predictive caching and its impact on application performance. His session shed light on leveraging AI to optimize caching mechanisms for enhanced efficiency.
Watch Ehsan’s session here:
AI-based Predictive Caching
🔹 Jeroen Speldekamp: “Going to the other side (headless)”
Jeroen delved into the concept of going “headless” and urged backend Sitecore developers to explore frontend development. He provided essential guidance, using Next.js as the chosen JavaScript framework.
Watch Jeroen’s session here:
Going to the other side (headless)
🔹 Vinay Kumar Y Jadav: “Monitor a Sitecore JSS application with Sentry”
Vinay’s session focused on troubleshooting and monitoring JSS applications. He demonstrated the utilization of Sentry.io as a tool to simplify the monitoring process, ensuring smooth operations.
Watch Vinay’s session here:
Monitor a Sitecore JSS application with Sentry
🔹 Álvaro Palmeira Montenegro: “Exploring Generative AI Tools for Sitecore Developers”
The event concluded with Álvaro’s engaging session on the use of AI tools to assist Sitecore developers. He showcased various generative AI tools and provided a comparative analysis of their effectiveness.
Watch Álvaro’s session here:
Exploring Generative AI Tools for Sitecore Developers
I invite you to reach out to the speakers if you have any questions or require further information regarding their respective sessions. The event was a remarkable success, thanks to the insightful discussions and invaluable knowledge shared by our esteemed presenters.
Thank you to all the participants for joining us, and we look forward to hosting more engaging events in the future!
Next.js allows you to create or update static pages after you’ve built your site. Incremental Static Regeneration (ISR) enables developers and content editors to use static-generation on a per-page basis, without needing to rebuild the entire site. With ISR, you can retain the benefits of static while scaling to millions of pages.
Static pages can be generated at runtime (on-demand) instead of at build-time with ISR. Using analytics, A/B testing, or other metrics, you are equipped with the flexibility to make your own tradeoff on build times.
Consider an e-commerce store with 100,000 products. At a realistic 50ms to statically generate each product page, the build would take almost 2 hours without ISR. With ISR, we can choose from:
Faster Builds → Generate the most popular 1,000 products at build-time. Requests made to other products will be a cache miss and statically generate on-demand: 1-minute builds.
Higher Cache Hit Rate → Generate 10,000 products at build-time, ensuring more products are cached ahead of a user’s request: 8-minute builds.
Exploring ISR
In my previous post, I’ve created a JSS-Next.js app that we deployed to Vercel. I also created a WebHook to trigger a full rebuild in Vercel (SSG). Now, I’ll explain how the ISR works in this same app.
Fetching Data and Generating Paths
Data:
ISR uses the same Next.js API to generate static pages: getStaticProps. By specifying revalidate: 5, we inform Next.js to use ISR to update this page after it’s generated.
Check the src/pages/[[…path]].tsx file and the getStaticProps function:
Paths:
Next.js defines which pages to generate at build-time based on the paths returned by getStaticPaths. For example, you can generate the most popular 1,000 products at build-time by returning the paths for the top 1,000 product IDs in getStaticPaths.
With this configuration, I’m telling Next.js to enable ISR and to revalidate every 5 sec. After this time period, the first user making the request will receive the old static version of the page and trigger the revalidation behind the scenes.
The Flow
Next.js can define a revalidation time per-page (e.g. 5 seconds).
The initial request to the page will show the cached page.
The data for the page is updated in the CMS.
Any requests to the page after the initial request and before the 5 seconds window will show the cached (hit) page.
After the 5 second window, the next request will still show the cached (stale) page. Next.js triggers a regeneration of the page in the background.
Once the page has been successfully generated, Next.js will invalidate the cache and show the updated product page. If the background regeneration fails, the old page remains unaltered.
Page Routing
Here’s a high-level overview of the routing process:
In the diagram above, you can see how the Next.js route is applied to Sitecore JSS.
The [[…path]].tsx Next.js route will catch any path and pass this information along to getStaticProps or getServerSideProps on the context object. The Page Props Factory uses the path information to construct a normalized Sitecore item path. It then makes a request to the Sitecore Layout Service REST API or Sitecore GraphQL Edge schema to fetch layout data for the item.
Demo!
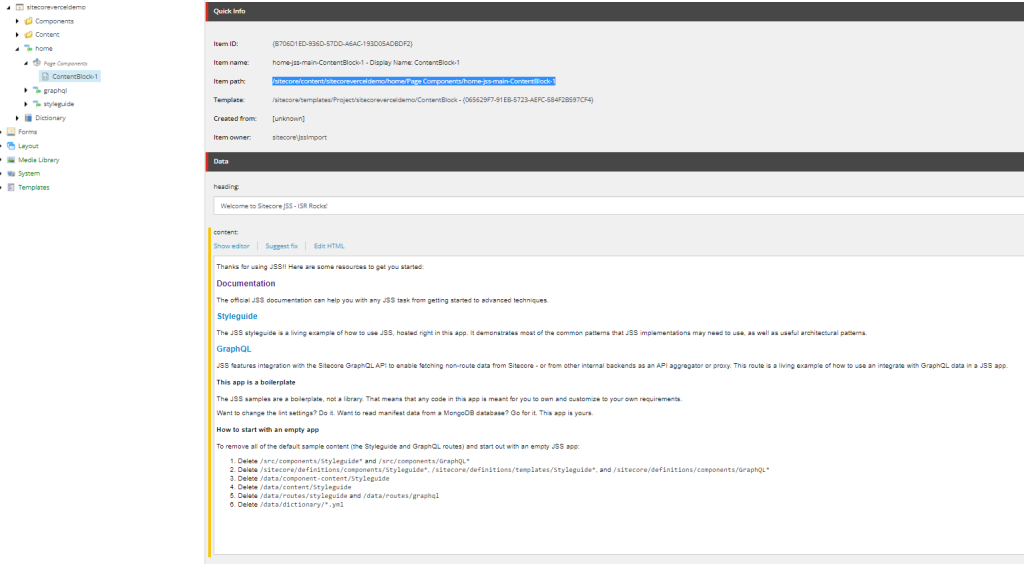
So, back to our previously deployed app in Vercel, login to Sitecore Content Editor and make a change on a field. I’m updating the heading field (/sitecore/content/sitecoreverceldemo/home/Page Components/home-jss-main-ContentBlock-1) by adding “ISR Rocks!”. We save the item and refresh the page deployed on Vercel. (Don’t publish! this will trigger the webhook that is defined in the publish:end event).
After refreshing the page, I can still see the old version:
But, if I keep checking what is going on in the ngrok, I can see the requests made to the layout service:
So, after refreshing again the page, I can see the changes there!
So, it got updated without the need of rebuilding and regenerating the whole site.
That’s it! I hope this post helps to understand how the ISR works and how to start with it on your Sitecore JSS implementation.
Thanks for reading and stay tuned for more Sitecore stuff!
In my previous post, I’ve explained how to configure the Blob Storage Module on a Sitecore 9.3+ instance. The following post assumes you are already familiar with it and you’ve your Sitecore instance making use of the Azure blob storage provider.
In this post I’ll show you how we can make use of Azure Functions (blob trigger) to optimize (compress) images on the fly, when those are uploaded to the media library, in order to gain performance and with a serverless approach.
Media Compression Flow
About Azure Functions and Blob Trigger
Azure Functions is an event driven, compute-on-demand experience that extends the existing Azure application platform with capabilities to implement code triggered by events occurring in Azure or third party service as well as on-premises systems. Azure Functions allows developers to take action by connecting to data sources or messaging solutions thus making it easy to process and react to events. Developers can leverage Azure Functions to build HTTP-based API endpoints accessible by a wide range of applications, mobile and IoT devices. Azure Functions is scale-based and on-demand, so you pay only for the resources you consume. For more info please refer to the official MS documentation.
Azure Functions
Azure Functions integrates with Azure Storage via triggers and bindings. Integrating with Blob storage allows you to build functions that react to changes in blob data as well as read and write values.
Creating the Azure Function
For building the blob storage trigger function I’ll be using Visual Code, so first of all make sure you have the Azure Functions plugin for Visual Code, you can get it from the marketplace or from the extensions menu, also from the link: vscode:extension/ms-azuretools.vscode-azurefunctions.
Azure Functions Plugin
Before proceeding, make sure you are logged into your Azure subscription. >az login.
Create an Azure Functions project: Click on the add function icon and then select the blob trigger option, give a name to the function.
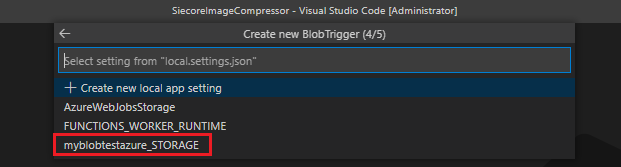
2. Choose the Blob Storage Account you are using in your Sitecore instance (myblobtestazure_STORAGE in my case).
3. Choose your blob container path (blobcontainer/{same})
4. The basics are now created and we can start working on our implementation.
Default function class
Generated project files
The project template creates a project in your chosen language and installs required dependencies. For any language, the new project has these files:
host.json: Lets you configure the Functions host. These settings apply when you’re running functions locally and when you’re running them in Azure. For more information, see host.json reference.
local.settings.json: Maintains settings used when you’re running functions locally. These settings are used only when you’re running functions locally. For more information, see Local settings file.
Edit the local.settgins.json file to add the connection string of your blob storage:
local.settings.json
The function implementation
using System.IO;
using Microsoft.Azure.WebJobs;
using Microsoft.Extensions.Logging;
using ImageMagick;
using Microsoft.WindowsAzure.Storage.Blob;

namespace SitecoreImageCompressor
{
    public static class CompressBlob
    {
        [FunctionName("CompressBlob")]
        public static async void Run([BlobTrigger("blobcontainer/{name}", Connection = "myblobtestazure_STORAGE")] CloudBlockBlob inputBlob, ILogger log)
        {
            log.LogInformation($"C# Blob trigger function Processed blob\n Name:{inputBlob.Name} \n Size: {inputBlob.Properties.Length} Bytes");

            if (inputBlob.Metadata.ContainsKey("Status") && inputBlob.Metadata["Status"] == "Processed")
            {
                log.LogInformation($"blob: {inputBlob.Name} has already been processed");
            }
            else
            {
                using (var memoryStream = new MemoryStream())
                {
                    await inputBlob.DownloadToStreamAsync(memoryStream);
                    memoryStream.Position = 0;

                    var before = memoryStream.Length;
                    var optimizer = new ImageOptimizer { OptimalCompression = true, IgnoreUnsupportedFormats = true };

                    if (optimizer.IsSupported(memoryStream))
                    {
                        var compressionResult = optimizer.Compress(memoryStream);

                        if (compressionResult)
                        {
                            var after = memoryStream.Length;
                            var gain = 100 - (float)(after * 100) / before;

                            log.LogInformation($"Optimized {inputBlob.Name} - from: {before} to: {after} Bytes. Optimized {gain}%");

                            await inputBlob.UploadFromStreamAsync(memoryStream);
                        }
                        else
                        {
                            log.LogInformation($"Image {inputBlob.Name} - compression failed...");
                        }
                    }
                    else
                    {
                        var info = MagickNET.GetFormatInformation(new MagickImageInfo(memoryStream).Format);

                        log.LogInformation($"Image {inputBlob.Name} - the format is not supported. Compression skipped - {info.Format}");
                    }
                }

                inputBlob.Metadata.Add("Status", "Processed");

                await inputBlob.SetMetadataAsync();
            }
        }
    }
}
As you can see, I’m creating and async task that will be triggered as soon as a new blob is added to the blob storage. Since we’re compressing and then uploading the modified image, we’ve to make sure the function is not triggered multiple times. For avoiding that, I’m also updating the image metadata with a “Status = Processed“.
The next step is to get the image from the CloudBlockBlob and then compress using the Magick.NET library. Please note that this library also provides a LosslessCompress method, for this implementation I choose to go with the full compression. Feel free to update and compare the results.
Nuget references
So, in order to make it working we need to install the required dependencies. Please run the following commands to install the Nuget packages:
Now we have everything in place. Let’s press F5 and see if the function is compiling
Terminal output
We are now ready to deploy to Azure and test the blob trigger! Click on the up arrow in order to deploy to Azure, choose your subscription and go!
Azure publish
Check the progress in the terminal and output window:
Testing the trigger
Now we can go to the Azure portal, go to the Azure function and double check that everything is there as expected:
Azure function from the portal
Go to the “Monitor” and click on “Logs” so we can have a look at the live stream when uploading an image to the blob storage. Now in your Sitecore instance, go to the Media Library and upload an image, this will upload the blob to the Azure Storage and the trigger will take place and compress the image.
Media Library Upload
Azure functions logs
As we can see in the logs the image got compressed, gaining almost 15%:
In this post I’m explaining how to switch the blob storage provider to make use of Azure Blob Storage. Before Sitecore 9.3, we could store the blobs on the DB or filesystem, Azure Blob Storage was not supported out of the box and even tough it was possible, it required some customizations to make it working, nowadays, since Sitecore 9.3 a module has been released and is very straightforward to setup, as you will see in this post.
By doing this we can significantly reduce costs and improve performance as the DB size won’t increase that much due to the media library items.
Introduction to Azure Blob storage
Azure Blob storage is Microsoft’s object storage solution for the cloud. Blob storage is optimized for storing massive amounts of unstructured data. Unstructured data is data that doesn’t adhere to a particular data model or definition, such as text or binary data.
Blob storage is designed for:
Serving images or documents directly to a browser.
Storing files for distributed access.
Streaming video and audio.
Writing to log files.
Storing data for backup and restore, disaster recovery, and archiving.
Storing data for analysis by an on-premises or Azure-hosted service.
Users or client applications can access objects in Blob storage via HTTP/HTTPS, from anywhere in the world. Objects in Blob storage are accessible via the Azure Storage REST API, Azure PowerShell, Azure CLI, or an Azure Storage client library.
For more info please refer here and also you can find some good documentation here.
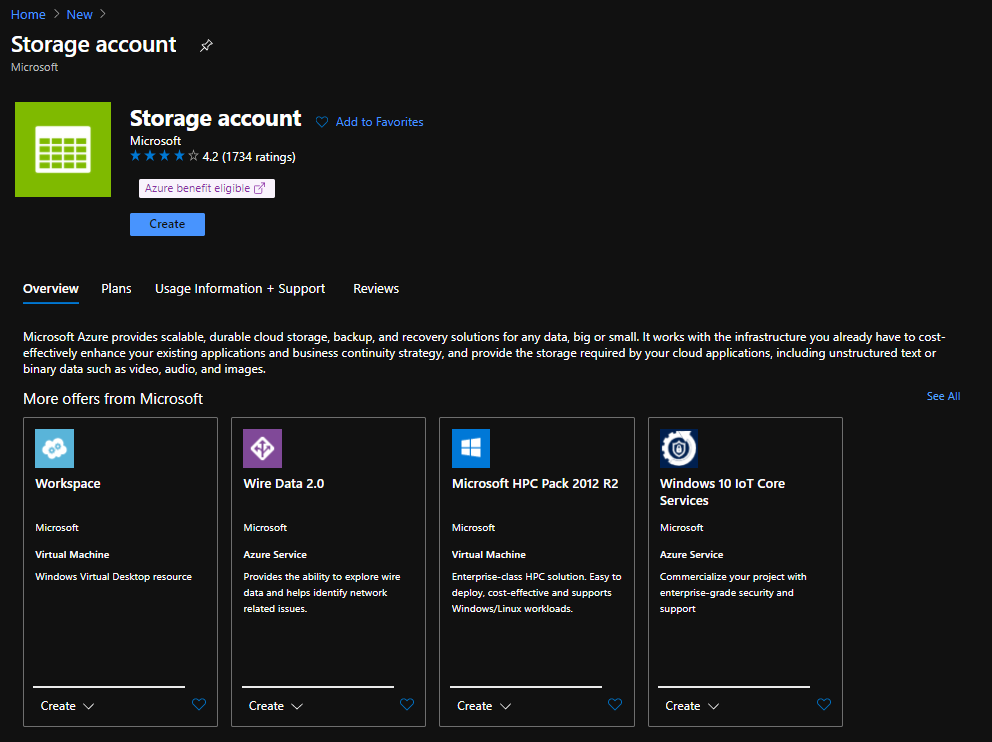
Creating your blob storage resource
Azure Storage Account
Create the resource by following the wizard and then check the “Access Keys” section, you’ll need the “Connection string” later.
Connection String and keys
Configuring your Sitecore instance
There are basically three main option to install the blob storage module into your instance:
Install the Azure Blob Storage module in Sitecore PaaS.
Use the Sitecore Azure Toolkit:
Use a new Sitecore installation with Sitecore Azure Toolkit
Use an existing Sitecore installation with Sitecore Azure Toolkit
Use Sitecore in the Azure Marketplace (for new Sitecore installations only)
Install the Azure Blob Storage module on an on-premise Sitecore instance.
Manually install the Azure Blob Storage module in PaaS or on-premise.
This time I’ll be focusing in the last option, manually installing the module, doesn’t matter if it’s a PaaS or on-premise approach.
7. In the \App_Config\Modules\Sitecore.AzureBlobStorage\Sitecore.AzureBlobStorage.config file, ensure that <param name="blobcontainer"> is the name you gave to the container after creating the resource.
Let’s test it!
If everything went well, then we can just test it by uploading a media item to the Sitecore media library
Let’s have a look now at the Storage Explorer in the Azure portal
Here we go, the image is now uploaded into the Azure blob storage, meaning the config is fine and working as expected.
In the following videos I’m showing how to use dotTrace to take a profiling session and how to take a memory dump to analyze and troubleshoot performance issues of your application running in Docker containers.
In my previous post you can find a quick way to get your Sitecore Demo up and running, have a look!
Profile Sitecore running in Docker containers
Getting a memory dump from a container
I hope this helps you on your performance troubleshooting when running Docker containers!
In this post I’ll share how to use Azure Redis Cache as Sitecore custom cache provider.
Azure Cache for Redis is a fully managed, distributed, in-memory cache that enables high-performance and scalable architectures. You can use it to create cloud or hybrid deployments that handle millions of requests per second at sub-millisecond latency, all with the configuration, security and availability benefits of a managed service. More info here.
The first step is to create the Redis cache in Azure, for this we log in to the Azure Portal and then add a new resource, search for “Azure Cache for Redis” and choose a plan, for this demo I selected a “Basic C1” plan, we can scale it later if needed.
Azure Redis Cache is now deployed and ready to connect to.
The next step is to get the connection string data and add a new entry “redis.sessions” into the connectionstrings.config file:
Now our app is connected to the Redis cache. Let’s now have a look at a custom cache implementation.
We start by creating a cache provider:
[Service(typeof(IRedisCacheProvider), Lifetime = Lifetime.Singleton)]
public class RedisCacheProvider : IRedisCacheProvider
{
    private static readonly Lazy<ConnectionMultiplexer> LazyConnection = new Lazy<ConnectionMultiplexer>(() =>
    {
        var connectionString = ConfigurationManager.ConnectionStrings["redis.sessions"].ConnectionString;
        var options = ConfigurationOptions.Parse(connectionString);

        options.AllowAdmin = true;
        options.SyncTimeout = 60000;
        options.ConnectRetry = 5;

        return ConnectionMultiplexer.Connect(options);
    });

    public static ConnectionMultiplexer Connection => LazyConnection.Value;

    private readonly IDatabase _redisCache;

    public RedisCacheProvider()
    {
        _redisCache = Connection.GetDatabase();
    }

    public IDatabase GetRedisCache()
    {
        return _redisCache;
    }

    public IServer GetServer()
    {
        return Connection.GetServer(Connection.GetEndPoints().FirstOrDefault());
    }
}
Now we need to a create a cache manager, that class will contain all the methods to call the cache and to communicate with Redis:
[Service(typeof(ICacheManager), Lifetime = Lifetime.Singleton)]
public class CacheManager : ICacheManager
{
    private readonly IDatabase _redisCache;
    private readonly IServer _redisServer;

    public CacheManager(IRedisCacheProvider redisCacheProvider)
    {
        _redisCache = redisCacheProvider.GetRedisCache();
        _redisServer = redisCacheProvider.GetServer();
    }

    private static readonly Dictionary<string, object> CacheKeyDictionary = new Dictionary<string, object>();

    public object Get(string key)
    {
        return Get(key, string.Empty);
    }

    public object Get(string key, string site)
    {
        var siteName = string.IsNullOrEmpty(site) ? Context.Site?.Name : site;
        var cacheKey = $"{siteName}{Context.Database?.Name}{Context.Language}{key}";
        var res = _redisCache.StringGet(cacheKey);

        return !string.IsNullOrEmpty(res) ? JsonConvert.DeserializeObject(res) : res;
    }

    public void Set(string key, object value)
    {
        Set(key, value, string.Empty);
    }

    public void Set(string key, object value, string site)
    {
        var siteName = string.IsNullOrEmpty(site) ? Context.Site?.Name : site;
        var cacheKey = $"{siteName}{Context.Database?.Name}{Context.Language}{key}";

        _redisCache.StringSet(cacheKey, JsonConvert.SerializeObject(value));
    }

    public IList<string> GetAllKeys()
    {
        return _redisServer.Keys().Select(k => k.ToString()).ToList();
    }

    public void Remove(string key)
    {
        _redisCache.KeyDelete(key);
    }

    public void ClearCache(object sender, EventArgs args)
    {
        Log.Info($"RedisCache Cache Clearer.", this);

        _redisServer.FlushAllDatabases();

        Log.Info("RedisCache Cache Clearer done.", (object)this);
    }

    public TObj GetCachedObject<TObj>(string cacheKey, Func<TObj> creator) where TObj : class
    {
        return GetCachedObject(cacheKey, creator, string.Empty);
    }

    public TObj GetCachedObject<TObj>(string cacheKey, Func<TObj> creator, string site) where TObj : class
    {
        if (string.IsNullOrEmpty(site))
        {
            site = Context.Site.Name;
        }

        var obj = Get(cacheKey, site) as TObj;

        if (obj == null)
        {
            // get the lock object
            var lockObject = GetCacheLockObject(cacheKey, site);

            try
            {
                lock (lockObject)
                {
                    obj = creator.Invoke();

                    Set(cacheKey, obj);
                }
            }
            finally
            {
                RemoveCacheLockObject(cacheKey, site);
            }
        }

        return obj;
    }

    private object GetCacheLockObject(string cacheKey, string site)
    {
        cacheKey += site;

        lock (CacheKeyDictionary)
        {
            if (!CacheKeyDictionary.ContainsKey(cacheKey))
            {
                CacheKeyDictionary.Add(cacheKey, new object());
            }

            return CacheKeyDictionary[cacheKey];
        }
    }

    private void RemoveCacheLockObject(string cacheKey, string site)
    {
        cacheKey += site;

        lock (CacheKeyDictionary)
        {
            if (CacheKeyDictionary.ContainsKey(cacheKey))
            {
                CacheKeyDictionary.Remove(cacheKey);
            }
        }
    }
}
It’s important to keep in mind that this is a distributed cache, meaning that all Sitecore instances connected to the same cache are sharing it, for example, if we’ve a setup with one CM instance and two CDs, all of those will be sharing the same cache, while in memory cache is specific to the instance. That’s why I’m adding the site name, database and language to the cache key.
Almost done, but now we have to think about one of the most important things when working with caches, when and how to invalidatethose.
We can just call the ClearCache()on the publish:end and publish:end:remote events, but I wanted to make it a bit flexible, as the cache is shared across instances is better to keep control on that rather than just flushing everything on each publish action.
I decided to go with a custom event handler approach. Check the config patch, I’m introducing the customCache:rebuild and customCache:rebuild:remote events:
<!--For more information on using transformations see the web.config examples at http://go.microsoft.com/fwlink/?LinkId=214134. -->
<configuration xmlns:patch="http://www.sitecore.net/xmlconfig/" xmlns:set="http://www.sitecore.net/xmlconfig/set" xmlns:xdt="http://schemas.microsoft.com/XML-Document-Transform">
  <sitecore>
    <pipelines>
      <initialize>
        <processor type="Foundation.RedisCache.Pipelines.Initialize, Foundation.RedisCache" method="InitializeFromPipeline" />
      </initialize>
    </pipelines>
    <commands>
      <command name="rediscache:cleancache" type="Foundation.RedisCache.Commands.CleanCacheCommand, Foundation.RedisCache" />
    </commands>
    <events xdt:Transform="Insert">
      <event name="customCache:rebuild">
        <handler type="Foundation.RedisCache.Events.EventHandlers.CacheRebuildEventHandler, Foundation.RedisCache" method="OnCustomCacheRebuild" />
      </event>
      <event name="customCache:rebuild:remote">
        <handler type="Foundation.RedisCache.Events.EventHandlers.CacheRebuildEventHandler, Foundation.RedisCache" method="OnCustomCacheRebuild" />
      </event>
    </events>
  </sitecore>
</configuration>
The initialize pipeline:
public class Initialize
{
    /// <summary>
    /// Initializes event subscription
    /// </summary>
    /// <param name="args">Args</param>
    public virtual void InitializeFromPipeline(PipelineArgs args)
    {
        var action = new Action<CacheRebuildEvent>(RaiseRemoteEvent);

        Sitecore.Eventing.EventManager.Subscribe<CacheRebuildEvent>(action);
    }

    /// <summary>
    /// Raises remote event
    /// </summary>
    /// <param name="cacheRebuildEvent"></param>
    private void RaiseRemoteEvent(CacheRebuildEvent cacheRebuildEvent)
    {
        var eventArgs = new object[] { new CacheRebuildEventArgs(cacheRebuildEvent) };

        Sitecore.Events.Event.RaiseEvent(Constants.CustomCacheRebuildEventNameRemote, eventArgs);
    }
}
I’ve also decided to create a simple command that we can just call from the Sitecore ribbon in order to flush this cache manually, this can help in case something get wrong and to avoid the need of manually flushing the redis cache from Azure.
[Serializable]
public class CleanCacheCommand : Sitecore.Shell.Framework.Commands.Command
{
    public override void Execute(Sitecore.Shell.Framework.Commands.CommandContext context)
    {
        var raiser = new CacheRebuildEventRaiser();
        var ev = new CacheRebuildEvent { CacheKey = Constants.ClearAll };

        raiser.RaiseEvent(ev);

        SheerResponse.Alert("Redis Cache flushed");
    }
}
That’s very much it! Let’s see this in action now!
So, to make use of this caching foundation, we just need to inject the ICacheManager and use the GetCachedObject method:
var cacheKey = $"RedisCacheTest-{path}";

            return _cacheManager.GetCachedObject(cacheKey, () =>
            {
                var slowMe = DateTime.Now + TimeSpan.FromSeconds(5);

                while (DateTime.Now < slowMe)
                {
                    //This is just an expensive operation...
                }

                return "/some/url";
            });
Please note that at the end the cache key will be generated by: {Site Name}{Database Name}{Language Name}{RedisCacheTest}-{path}.
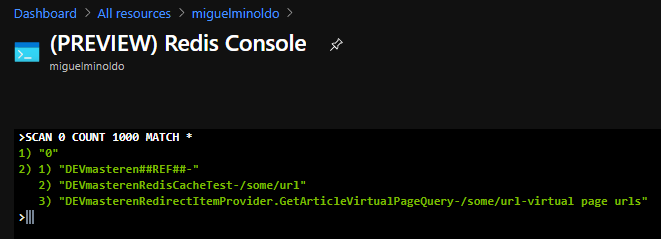
Let’s check now the Redis Cache Console in Azure, we can run the commandSCAN 0 COUNT 1000 MATCH * to get all keys from the cache:
As you can see the “RedisCacheTest” is there!
Let me take the opportunity to introduce the Redis Cache Visual Code extension, find the details here.
The extension provided a quick and easy way to browse the Redis cache contents,
When is time to test our websites and see how it is performing from the server side perspective, there are a bunch of tools, options and solutions available. This time I’m using the tool I like the most, it’s free and really powerful: JMeter. In addition to this, we can then easily run our test through BlazeMeter to make sure we get the less impact from the network latency or any other network related issue.
Script that crawls the Sitemap.xml
The main idea behind this script, was to make it completely generic, as for our case we need to run it through a bunch of different sites that we have at our Website Factory. The requirement for passing the performance KPI was to reach a certain throughput (requests per second) in less than 3 seconds average time.
Crawling the Sitemap.xml was then the best option, we have a tool that runs the JMX script from a VM that is in the same datacenter, and we can trigger it just by passing one parameter (domain).
Let’s me now explain a bit how the script works:
User Defined Variables: Configure the user variables to use on the script, the domain is everything you need to setup.
Constant Throughput Timer: This is for the script to generate the traffic we want to test with (throughput).
Set it to 1800 to get a 30 RPS Throughput
I’ve created two diffrent thread groups:
New Sessions and Existing Sessions: Using the HTTP Cookie Manager and HTTP Cache Manager elements, we tell the script to clean the cookies and cache on each iteration. For our tests we need to generate 150 Virtual Users (70% new and 30% returning users):
HTTP Request: We configure here the get method to the domain variable /sitemap.xml
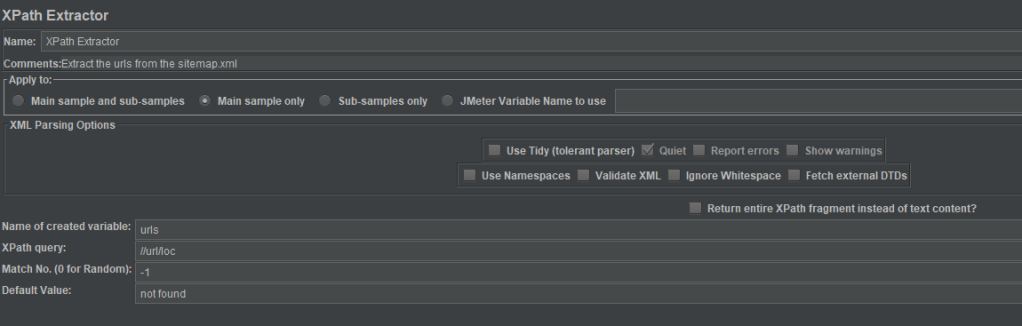
The XPath Extractor: Will take the URLs from the sitemap.xml and store the results in the urls variable.
The foreach controller: Will iterate over the urls previously filled with all the Sitemap.xml urls.
The HTTP Request: Finally, we do the request to the URL.
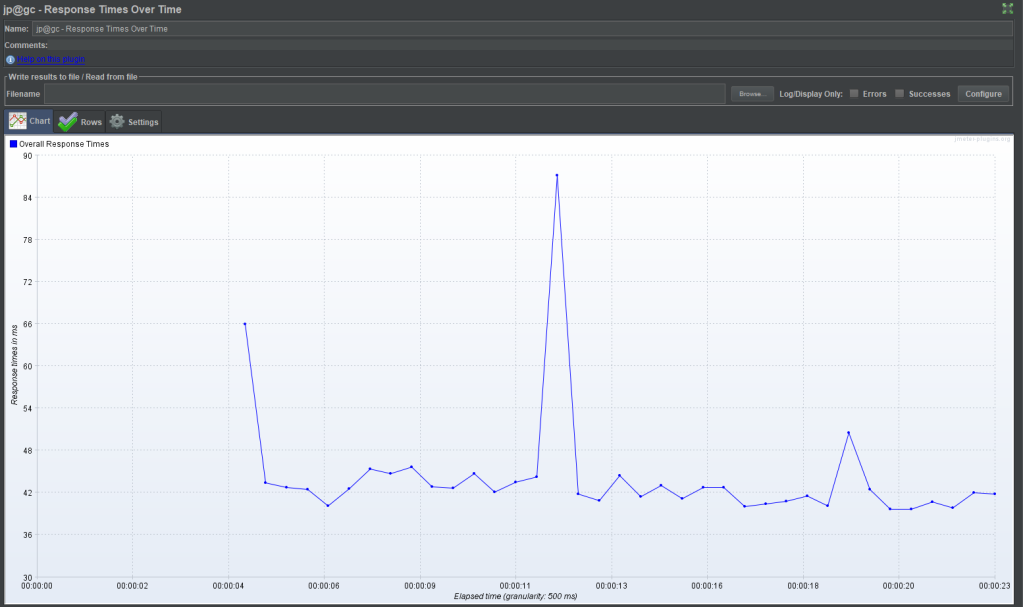
The Listeners:
Summary report
Response time over time graph
Transactions over time graph
Results tree
That’s it! You can now upload it to BlazeMeter and run it from there to get more accurate results, removing any network related issue.
I hope you find this useful, find the script here: GitHub just make sure you have the plugin manager installed on your JMeter.